How to Get Relief from Back Pain by Doing Yoga Poses
Back pain can make even the simplest tasks feel overwhelming, whether it’s from sitting all day, lifting heavy objects, or just the natural aging process. Luckily, yoga is a fantastic way to ease that ache and strengthen your back naturally. Yoga poses work by stretching tight muscles, building core strength to support your spine, and reducing stress that often worsens back pain.
2/22/2025


How to Get Relief from Back Pain by Doing Yoga Poses: 8 Effective Poses for 2025
Back pain can be a real drag, right? Whether it’s from sitting at a desk all day, lifting heavy stuff, or just getting older, that nagging ache in your lower or upper back can make life tough. But here’s some good news: yoga can be a game-changer! Yoga isn’t just about twisting into pretzel shapes—it’s a gentle, effective way to stretch, strengthen, and relax your back, helping you find relief naturally. In this blog, we’ll dive into 8 yoga poses that can ease back pain, explain how to do them step by step, and share tips to make them work for you. Let’s get started!
Why Yoga Works for Back Pain
Before we jump into the poses, let’s talk about why yoga is so awesome for back pain. Yoga combines stretching, strengthening, and deep breathing, which can do wonders for your spine. It helps improve your posture, makes your core muscles stronger (those are the ones that support your back), and reduces stress and tension that often make back pain worse. Plus, it boosts blood flow to your back muscles, helping them heal. Whether your pain is mild or chronic, these poses can bring relief—if done right. Always check with a doctor if your pain is severe, especially for issues like herniated discs or sciatica. Now, let’s get moving!
8 Yoga Poses to Relieve Back Pain
Here are 8 simple yoga poses that target back pain. They’re beginner-friendly, but even if you’re a pro, you’ll feel the benefits. Do these for 15–30 minutes a day, 3–4 times a week, and you might notice a difference in just a few weeks. Let’s break them down.
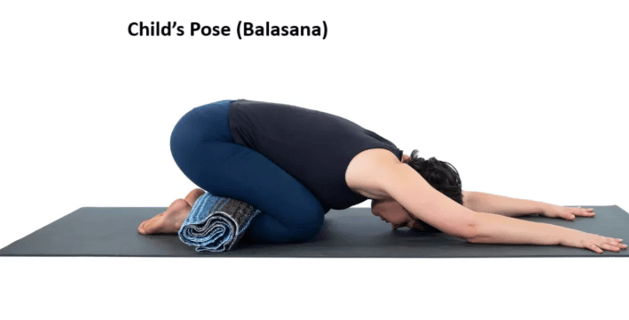
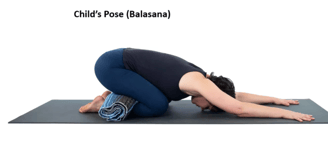
1. Child’s Pose (Balasana)
Why it helps: This pose is like a big hug for your lower back. It stretches your spine, hips, and thighs, easing tension.
How to do it:
Kneel on the floor, sit back on your heels, and stretch your arms forward.
Lower your forehead to the ground and relax your chest toward your thighs.
Keep your arms extended or rest them by your sides—whatever feels good.
Breathe deeply for 30 seconds to 1 minute.
Tips: If your knees or ankles hurt, put a cushion or blanket under your thighs. Skip this if you have knee problems.

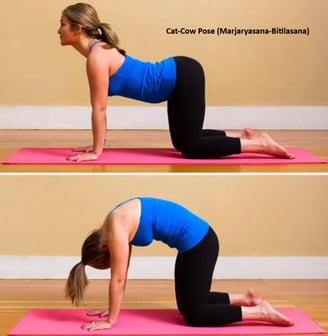
2. Cat-Cow Stretch (Marjaryasana-Bitilasana)
Why it helps: This move loosens up your entire spine, from your neck to your lower back, and feels amazing.
How to do it:
Get on all fours, with your wrists under your shoulders and knees under your hips.
Inhale, arch your back downward (Cow Pose), lifting your head and tailbone up.
Exhale, round your spine upward like a cat stretching (Cat Pose), tucking your chin to your chest.
Flow between these two for 8–10 rounds, matching your breath.
Tips: Go slow and don’t force it. If your wrists hurt, rest on your forearms instead.
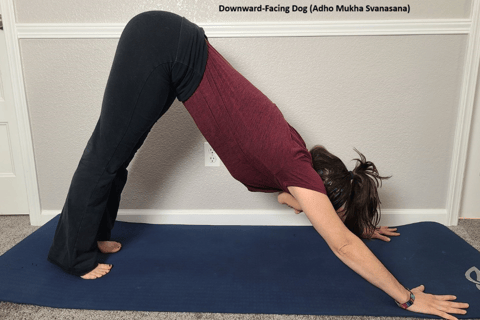
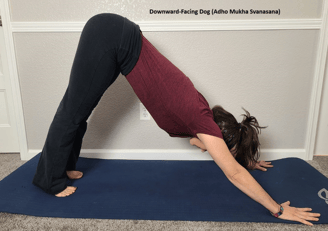
3. Downward-Facing Dog (Adho Mukha Svanasana)
Why it helps: This pose strengthens your back and stretches your hamstrings and calves, taking pressure off your spine.
How to do it:
Start on all fours, then lift your hips up and back to form an upside-down V shape.
Keep your hands shoulder-width apart and feet hip-width apart, pressing your heels down (it’s okay if they don’t touch the floor).
Hold for 30 seconds to 1 minute, breathing deeply.
Tips: Bend your knees a bit if your hamstrings are tight. Avoid this pose if you have high blood pressure or shoulder issues.
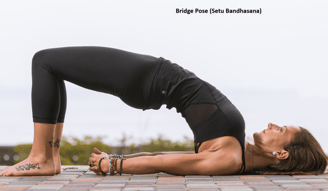
4. Bridge Pose (Setu Bandhasana)
Why it helps: It strengthens your lower back and glutes while stretching your chest and spine, giving your back a nice lift.
How to do it:
Lie on your back, bend your knees, and place your feet flat on the floor, hip-width apart.
Press your feet into the floor and lift your hips toward the ceiling.
Keep your arms by your sides or clasp your hands under your back for support.
Hold for 15–30 seconds, then lower slowly.
Tips: Don’t arch your lower back too much—if it hurts, lower your hips a bit.
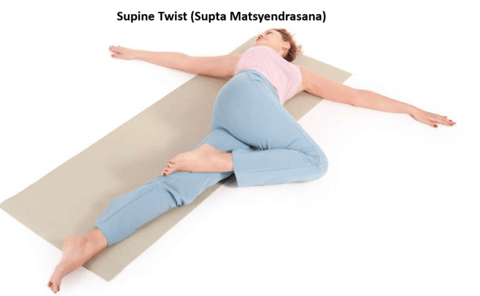
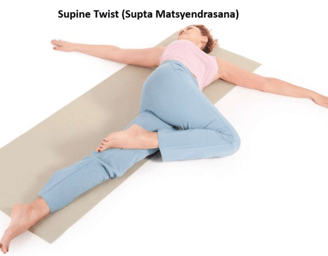
5. Supine Twist (Supta Matsyendrasana)
Why it helps: This twist releases tension in your spine and lower back, plus it’s super relaxing.
How to do it:
Lie on your back, hug your knees to your chest, then drop both knees to one side.
Keep your shoulders grounded and extend your arms out to the sides in a T shape.
Turn your head in the opposite direction of your knees.
Hold for 30 seconds on each side, breathing deeply.
Tips: Use a pillow under your knees if it’s uncomfortable. Avoid if you have serious disc problems.

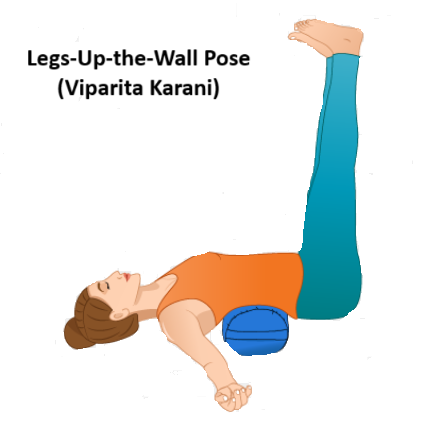
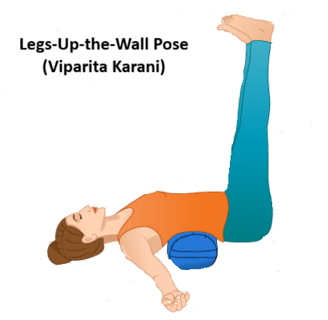
6. Legs-Up-the-Wall Pose (Viparita Karani)
Why it helps: This gentle inversion reduces lower back pain by improving circulation and calming your nervous system.
How to do it:
Sit sideways next to a wall, then swing your legs up the wall as you lie back on the floor.
Keep your arms relaxed by your sides or overhead, and close your eyes.
Stay here for 5–10 minutes, breathing slowly.
Tips: Put a folded blanket under your hips for extra comfort. Skip this if you have glaucoma or high blood pressure.
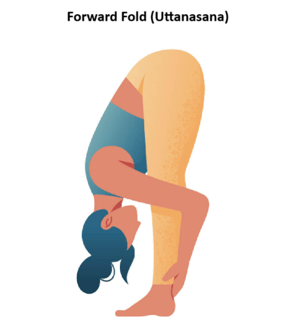
7. Forward Fold (Uttanasana)
Why it helps: This pose stretches your hamstrings and lower back, relieving tightness that can cause pain.
How to do it:
Stand with your feet hip-width apart, then hinge at your hips and fold forward.
Let your head hang loose and place your hands on the floor, your shins, or hold opposite elbows.
Hold for 30 seconds to 1 minute, breathing deeply.
Tips: Bend your knees if your hamstrings are tight. Avoid if you have recent back injuries.

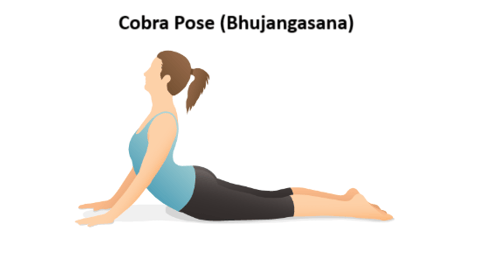
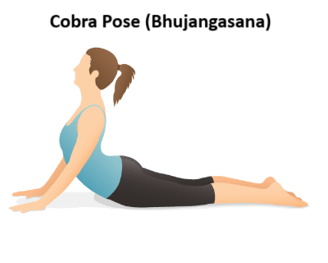
8. Cobra Pose (Bhujangasana)
Why it helps: This pose strengthens your back muscles and opens up your chest, counteracting slouching and poor posture.
How to do it:
Lie face down, place your hands under your shoulders, and press your palms into the floor.
Inhale, lift your chest off the ground, keeping your elbows slightly bent.
Look forward or slightly up, but don’t strain your neck.
Hold for 15–30 seconds, then lower back down.
Tips: Don’t lift too high—keep it gentle. Skip if you have severe back injuries.
Tips for Success
To get the most out of these yoga poses for back pain relief, keep these tips in mind:
Be Consistent: Practice these poses daily or at least 3–4 times a week for 15–30 minutes
Warm Up First: Do a short walk or gentle stretches before starting to prepare your body.
Listen to Your Body: If a pose hurts, stop or adjust it. Pain isn’t gain here!
Breathe Deeply: Use slow, deep breaths to relax and reduce stress, which can worsen back pain.
Use Props: Yoga blocks, straps, or bolsters can make poses easier and more comfortable.
When to Seek Help
Yoga is amazing, but it’s not a cure-all. If your back pain doesn’t improve, gets worse, or comes with numbness or shooting pain, see a doctor or physical therapist. These poses are meant to complement, not replace, medical advice, especially for serious conditions.
Health and Fitness
Health and fitness is a journey of balanced nutrition, regular exercise, and mindful well-being for a vibrant life..
Yoga
Meditation
contact@trustislife.com
© 2024. All rights reserved.