How to Get Relief from Neck Pain by Doing Yoga Poses (9 Effective Poses for 2025)
Learn 9 simple yoga poses to relieve neck pain naturally in 2025. This guide includes step-by-step instructions, tips and benefits for easing tension and improving flexibility. You’re at your desk, after a long day, or waking up stiff, these poses can help. Give them a try, stay consistent, and let your neck thank you!
2/20/2025


How to Get Relief from Neck Pain by Doing Yoga Poses: 9 Effective Poses for 2025
Neck pain is something a lot of us deal with, whether it’s from hunching over a computer, staring at our phones too long, or just the everyday stresses of life. It can make you feel stiff, achy, and frustrated. But here’s the good news: yoga can be a simple, natural way to ease that tension and bring relief. Yoga doesn’t just stretch your muscles—it also calms your mind, which is key when neck pain is linked to stress or poor posture. In this blog, we’ll walk you through 8 yoga poses that target neck pain, explain how to do them step by step, and share tips to make them work for you. Let’s dive in!
Why Yoga Helps with Neck Pain
Neck pain often comes from tight muscles, bad posture, or stress, and yoga tackles all of these. The gentle stretches and mindful movements in yoga help loosen up the muscles around your neck and shoulders, improve flexibility, and strengthen the areas that support your neck. Plus, the deep breathing in yoga reduces stress, which can make neck pain worse. Whether your pain is mild or persistent, these poses can help—if you do them safely. Always talk to a doctor if your neck pain is severe, especially if it’s accompanied by numbness, dizziness, or headaches.
Now, let’s get into the poses that can bring you relief!
9 Yoga Poses to Relieve Neck Pain
Here are 8 simple yoga poses designed to ease neck pain. They’re easy to follow, even if you’re new to yoga, and they target the neck, shoulders, and upper back. Practice these for 15–30 minutes a few times a week, and you might start feeling better in no time. Here’s how to do each one:
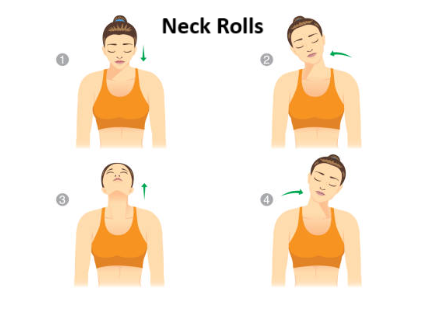
1. Neck Rolls
Why it helps: Neck rolls are a super simple way to release tightness and improve blood flow in your neck.
How to do it:
Sit comfortably on a chair or the floor with your spine straight.
Slowly drop your chin to your chest, then gently roll your head in a circular motion. Start with small circles and gradually make them bigger.
Roll your head clockwise for 30 seconds, then counterclockwise for another 30 seconds.
Keep your movements slow and smooth, and breathe deeply the whole time.
Tips: Don’t force your head—let it move naturally. If you feel dizzy, stop and take a break.
Benefits: Reduces stiffness, boosts flexibility, and relieves tension in the cervical spine.
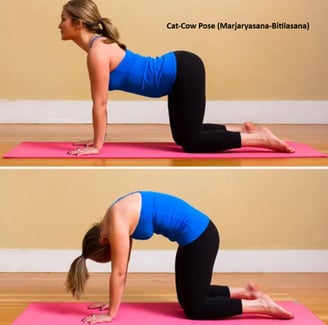
2. Cat-Cow Pose (Marjaryasana-Bitilasana)
Why it helps: This pose mobilizes your entire spine, including your neck, by alternating between stretching and relaxing.
How to do it:
Get on all fours, with your wrists under your shoulders and knees under your hips.
Inhale, arch your back downward (Cow Pose), lifting your tailbone and head toward the ceiling. Look slightly upward, but don’t strain your neck.
Exhale, round your spine upward (Cat Pose), tucking your chin to your chest and pulling your belly in.
Flow between these two for 8–10 rounds, moving with your breath.
Tips: Move slowly and keep your neck relaxed. If your wrists hurt, rest on your forearms.
Benefits: Improves spinal mobility, reduces neck and upper back tightness, and eases tension.
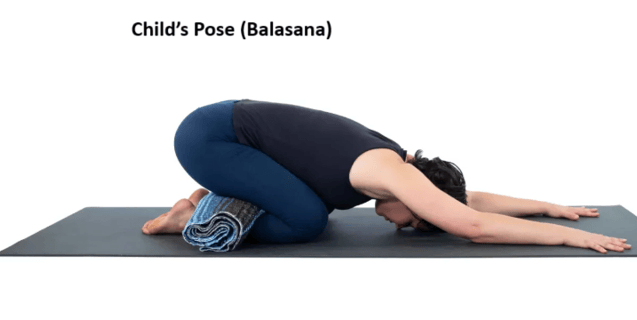
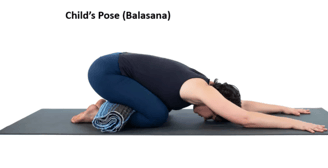
3. Child’s Pose (Balasana)
Why it helps: This restful pose stretches your neck, shoulders, and upper back while calming your mind.
How to do i:
Start on your hands and knees in a tabletop position.
Sit back on your heels, stretch your arms forward, and lower your forehead to the ground or a block if it doesn’t reach.
Relax your shoulders and breathe deeply for 1–2 minutes.
Tips: Use a cushion under your forehead or knees if you feel discomfort. Avoid if you have knee or hip issues.
Benefits: Relieves neck and shoulder tension, stretches the spine, and promotes relaxation.
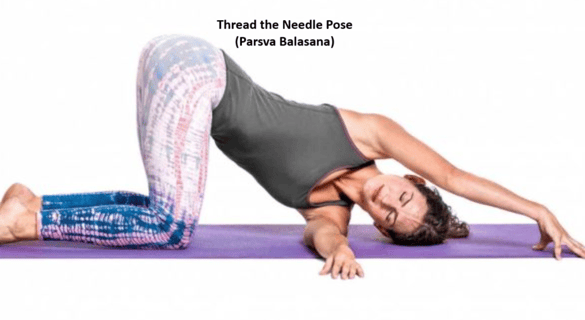
4. Thread the Needle Pose (Parsva Balasana)
Why it helps: This pose opens up your shoulders and upper back, which are often tight when your neck hurts.
How to do it:
Start on all fours, with your hands under your shoulders and knees under your hips.
Inhale, lift your right arm up toward the sky, twisting your torso slightly.
Exhale, thread your right arm under your left arm, lowering your shoulder and the side of your head to the ground.
Hold for 30 seconds to 1 minute, breathing deeply, then switch sides.
Tips: Keep your hips stable and don’t rush the movement.
Benefits: Stretches shoulders, upper back, and neck, improving mobility and reducing stiffness.


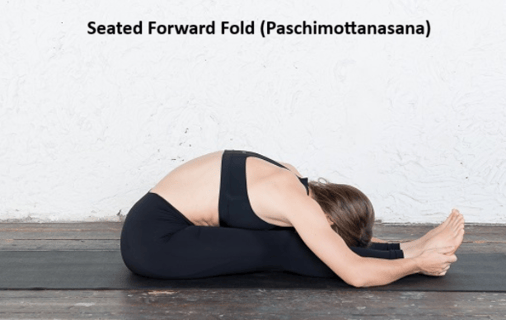
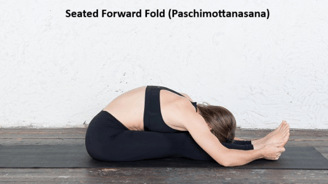
5. Seated Forward Bend (Paschimottanasana)
Why it helps: This pose stretches your spine and hamstrings, releasing tension that can radiate to your neck.
How to do it:
Sit on the floor with your legs straight out in front of you.
Inhale, lengthen your spine, then exhale and fold forward, reaching for your feet or shins.
Keep your neck relaxed, letting your head hang naturally. Hold for 30 seconds to 1 minute, breathing deeply.
Tips: Bend your knees if your hamstrings are tight. Avoid if you have recent neck or back injuries.
Benefits: Stretches the spine and neck, relieves stress, and promotes relaxation.


6. Eagle Arms (Garudasana Arms)
Why it helps: This stretch targets your upper back, shoulders, and neck, releasing tightness that contributes to neck pain.
How to do it:
Sit or stand tall with a straight spine.
Extend your arms in front of you, parallel to the ground.
Cross your right arm under your left, bringing your forearms together. If possible, wrap your palms to touch; if not, keep them facing each other.
Lift your elbows slightly while keeping your shoulders relaxed. Hold for 30 seconds to 1 minute, then switch sides.
Tips: Don’t hunch your shoulders—keep them down and relaxed.
Benefits: Releases shoulder and neck tension, improves upper back mobility.
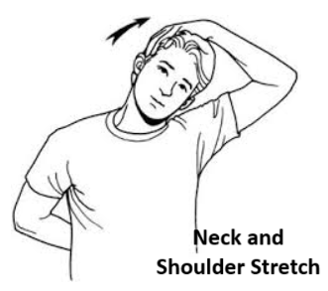
8. Neck and Shoulder Stretch
Why it helps: This simple stretch targets tight neck and shoulder muscles, which are often the root of neck pain.
How to do it:
Sit comfortably with your back straight.
Tilt your right ear toward your right shoulder, feeling a stretch along the left side of your neck.
Hold for 20–30 seconds, then switch sides. For a deeper stretch, gently press your right hand on your head.
Tips: Don’t force the stretch—let it be gentle. Stop if you feel any sharp pain.
Benefits: Relieves tightness in the neck and shoulders, increases flexibility, and improves range of motion.

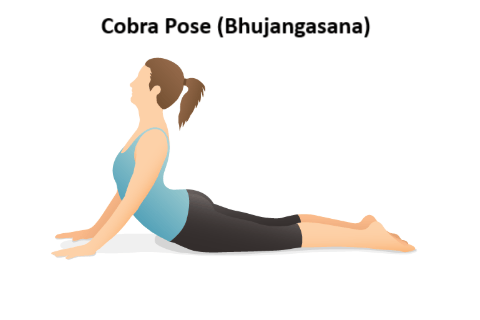
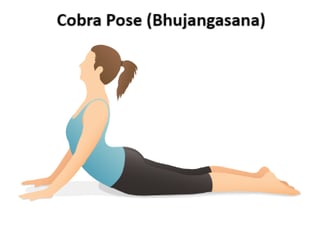
7. Cobra Pose (Bhujangasana)
Why it helps: This gentle backbend opens your chest, shoulders, and neck, counteracting the forward slouch that often causes neck pain.
How to do it:
Lie on your stomach, place your hands under your shoulders, and keep your elbows close to your body.
Press into your palms and gently lift your chest off the ground, keeping a slight bend in your elbows.
Lengthen your neck forward, not backward, and hold for 15–30 seconds, then lower down.
Tips: Don’t overarch your neck—keep it neutral. Avoid if you have severe neck injuries.
Benefits: Opens the chest and neck, improves posture, and reduces strain from slouching.

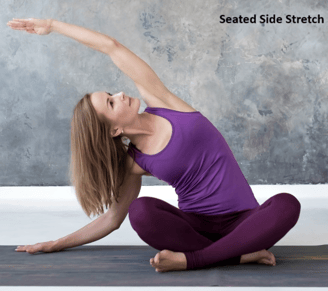
9. Seated Side Stretch
Why it helps: This pose stretches the sides of your neck and upper body, relieving tension that builds up from poor posture or long hours sitting.
How to do it:
Sit cross-legged or in a chair with your spine straight.
Raise your right arm overhead, then bend it to the left, reaching toward the opposite side while keeping your left hand on the ground or chair for support.
Feel the stretch along your right side and neck. Hold for 30 seconds, then switch sides.
Tips: Keep your movements slow and controlled. Avoid if you have shoulder injuries.
Benefits: Stretches the neck, shoulders, and sides, improves posture, and reduces tension.
Tips for Success
To get the most out of these yoga poses for neck pain relief, follow these tips:
Practice Regularly: Do these poses daily or 3–4 times a week for 15–30 minutes
Warm Up: Start with a few neck rolls or shoulder shrugs to prepare your muscles.
Listen to Your Body: Stop if a pose hurts. Pain means you’re doing too much—adjust or skip it.
Breathe Deeply: Use slow, deep breaths to relax and reduce stress, which can worsen neck pain.
Use Props: Yoga blocks, straps, or cushions can make poses more comfortable and effective.
When to Seek Help
Yoga is a great tool, but it’s not a replacement for medical advice. If your neck pain persists, gets worse, or comes with symptoms like numbness, headaches, or dizziness, see a doctor or physical therapist. These poses are meant to complement, not replace, professional care.
Final Thoughts
Neck pain doesn’t have to slow you down. With these 9 yoga poses—Neck Rolls, Cat-Cow Pose, Child’s Pose, Thread the Needle, Seated Forward Bend, Eagle Arms, Cobra Pose, Neck and Shoulder Stretch, and Seated Side Stretch—you can start feeling relief naturally. Yoga is all about moving mindfully and listening to your body, and it’s backed by plenty of success stories in 2025. Whether you’re at your desk, after a long day, or waking up stiff, these poses can help. Give them a try, stay consistent, and let your neck thank you!
Health and Fitness
Health and fitness is a journey of balanced nutrition, regular exercise, and mindful well-being for a vibrant life..
Yoga
Meditation
contact@trustislife.com
© 2024. All rights reserved.